Amazon Athena
Amazon Athena is a serverless, interactive query service that makes it easy to analyze data directly in Amazon S3 using standard SQL. When integrated with Deepnote, Athena allows you to run SQL queries against large datasets stored in S3 and visualize the results right in your notebooks.
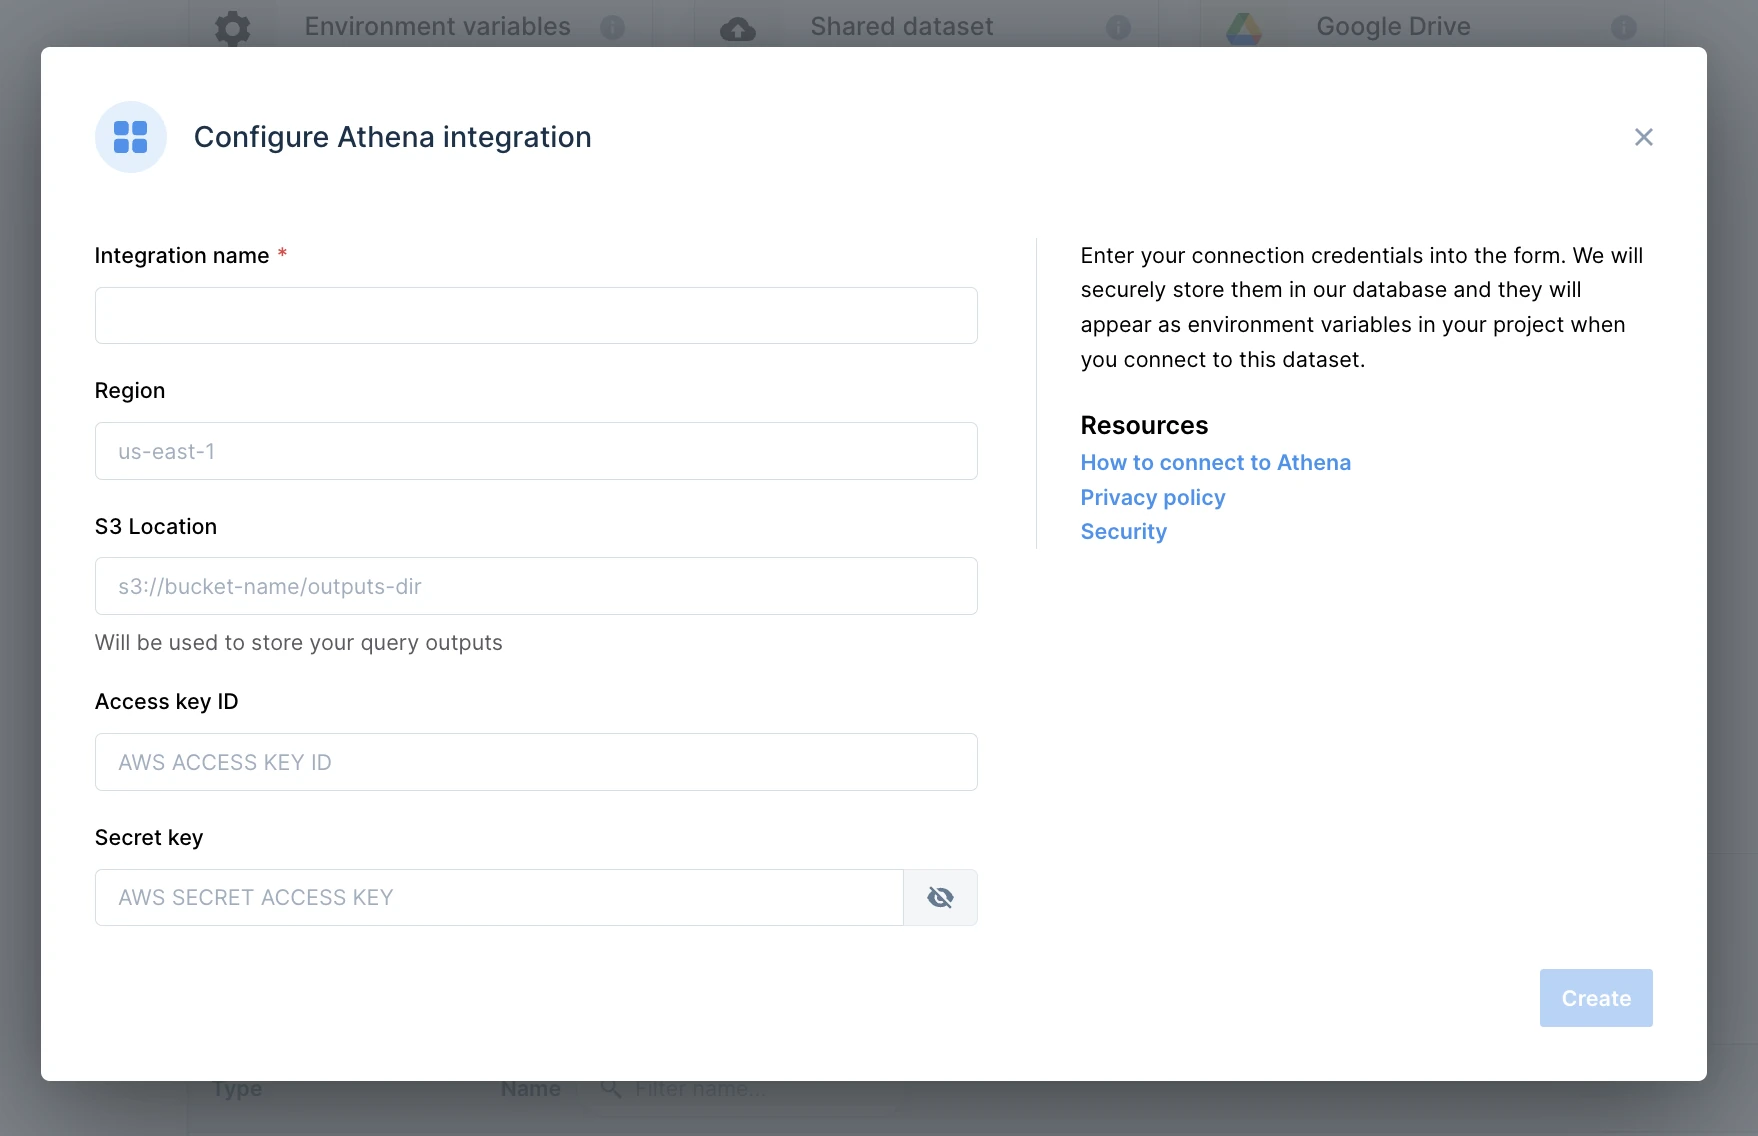
To add a connection to Amazon Athena, go to Integrations via the right-hand sidebar, create a new Athena integration, and enter your credentials:
After that's done, connect the new integration to your project using the Integrations sidebar and query it using SQL cells.
How to Get Started with Amazon Athena in Deepnote
Our setup will consist of these specific components:
-
S3 Data Bucket (
deepnote-athena-demo-data): This bucket will store our NYC Airbnb dataset. S3 buckets provide scalable, secure storage that Athena can directly query. -
S3 Query Results Bucket (
athena-demo-results): Athena needs a dedicated location to save query results. This separation helps organize our analytics environment and manage costs. -
IAM User (
deepnote-athena-demo-user): This user will have precisely the permissions needed to access both our S3 buckets and our Athena setup. Creating a dedicated user with minimal permissions follows AWS security best practices. -
Athena Database and Table: We'll create a database called
airbnb_demowith a table that maps to our NYC Airbnb dataset. This will allow us to query this data using standard SQL. -
Deepnote Integration: Finally, we'll connect all of these AWS resources to Deepnote, enabling interactive data analysis in a collaborative notebook environment.
Step 1: Create S3 Buckets
We need two S3 buckets - one for our data and one for Athena query results.
Create the Data Bucket
- Sign in to the AWS Management Console
- Navigate to the S3 service
- Click Create bucket
- Enter the bucket name
deepnote-athena-demo-data - Choose your preferred AWS Region
- Leave default settings for most options
- Click Create bucket
Create the Query Results Bucket
- Click Create bucket again
- Enter the name
athena-demo-results - Choose the same region as your data bucket
- Leave default settings for most options
- Click Create bucket
Step 2: Upload Sample Data to Your Data Bucket
We'll use the NYC Airbnb dataset for this guide:
- First, download the Airbnb dataset from DeepNote by visiting http://deepnote.com/static/data/AB_NYC_2019.csv in your web browser
- Save the file to your computer
- In the AWS console, navigate to your
deepnote-athena-demo-databucket - Click Upload
- Click Add files and select the downloaded CSV file
- Click Upload
- After the upload completes, you should see the file listed in your bucket
Step 3: Create an IAM User for Athena Access
Now we'll create a user with permissions to access S3 and Athena:
- Navigate to the IAM service in the AWS Console
- In the sidebar, click Users
- Click Create user
- Enter the name
deepnote-athena-demo-user - Click Next: Permissions
- Click Attach existing policies directly
- Search for and select these policies:
AmazonAthenaFullAccessAmazonS3ReadOnlyAccess
- Click Next: Tags (optional to add tags)
- Click Next: Review
- Click Create user
- From the users list, select your newly created user
deepnote-athena-demo-user - Click on the Security credentials tab
- Scroll down to the Access keys section
- Click Create access key
- Select Third-party service as the use case
- Check the acknowledgment box and click Next
- (Optional) Add a description tag and click Create access key
- IMPORTANT: You'll see a page with your Access key ID and Secret access key. Download the CSV file or copy both values immediately. You'll need these for Deepnote and you won't be able to see the secret key again after you close this page.
Step 4: Setup Custom IAM Policy for S3 Write Access
The built-in policies don't provide write access to your results bucket, so let's create a custom policy:
- In the IAM console, navigate to Policies
- Click Create policy
- Switch to the JSON tab
- Paste the following policy with our specific bucket names:
{
  "Version": "2012-10-17",
  "Statement": [
    {
      "Effect": "Allow",
      "Action": [
        "s3:GetBucketLocation",
        "s3:GetObject",
        "s3:ListBucket",
        "s3:ListBucketMultipartUploads",
        "s3:ListMultipartUploadParts",
        "s3:AbortMultipartUpload",
        "s3:PutObject"
      ],
      "Resource": [
        "arn:aws:s3:::athena-demo-results",
        "arn:aws:s3:::athena-demo-results/*"
      ]
    }
  ]
}
- Click Next: Tags (optional)
- Click Next: Review
- Name the policy
AthenaResultsBucketAccess - Click Create policy
- Navigate back to Users
- Select your
athena-deepnote-user - Click Add permissions
- Select Attach existing policies directly
- Search for and select your new
AthenaResultsBucketAccesspolicy - Click Next and then Add permissions
Step 5: Configure Athena
Now we'll set up Athena to query our data:
-
Navigate to the Athena service in the AWS Console
-
If this is your first time using Athena, you'll need to set up a query result location:
- Click Settings
- Enter the S3 path to your results bucket:
s3://athena-demo-results/ - Click Save
-
Create a database:
- In the query editor, run:
CREATE DATABASE airbnb_demo; -
Create a table for the NYC Airbnb data:
- Run the following query:
CREATE EXTERNAL TABLE airbnb_demo.nyc_listings ( id BIGINT, name STRING, host_id BIGINT, host_name STRING, neighbourhood_group STRING, neighbourhood STRING, latitude DOUBLE, longitude DOUBLE, room_type STRING, price INT, minimum_nights INT, number_of_reviews INT, last_review DATE, reviews_per_month DOUBLE, calculated_host_listings_count INT, availability_365 INT ) ROW FORMAT DELIMITED FIELDS TERMINATED BY ',' STORED AS TEXTFILE LOCATION 's3://deepnote-athena-demo-data/' TBLPROPERTIES ('skip.header.line.count'='1');NOTE: We've set the table to look for data in the root of our
deepnote-athena-demo-databucket. Make sure your CSV file is uploaded to the root of this bucket. -
Test a simple query:
SELECT * FROM airbnb_demo.nyc_listings LIMIT 10;You should see the first 10 records from the dataset.
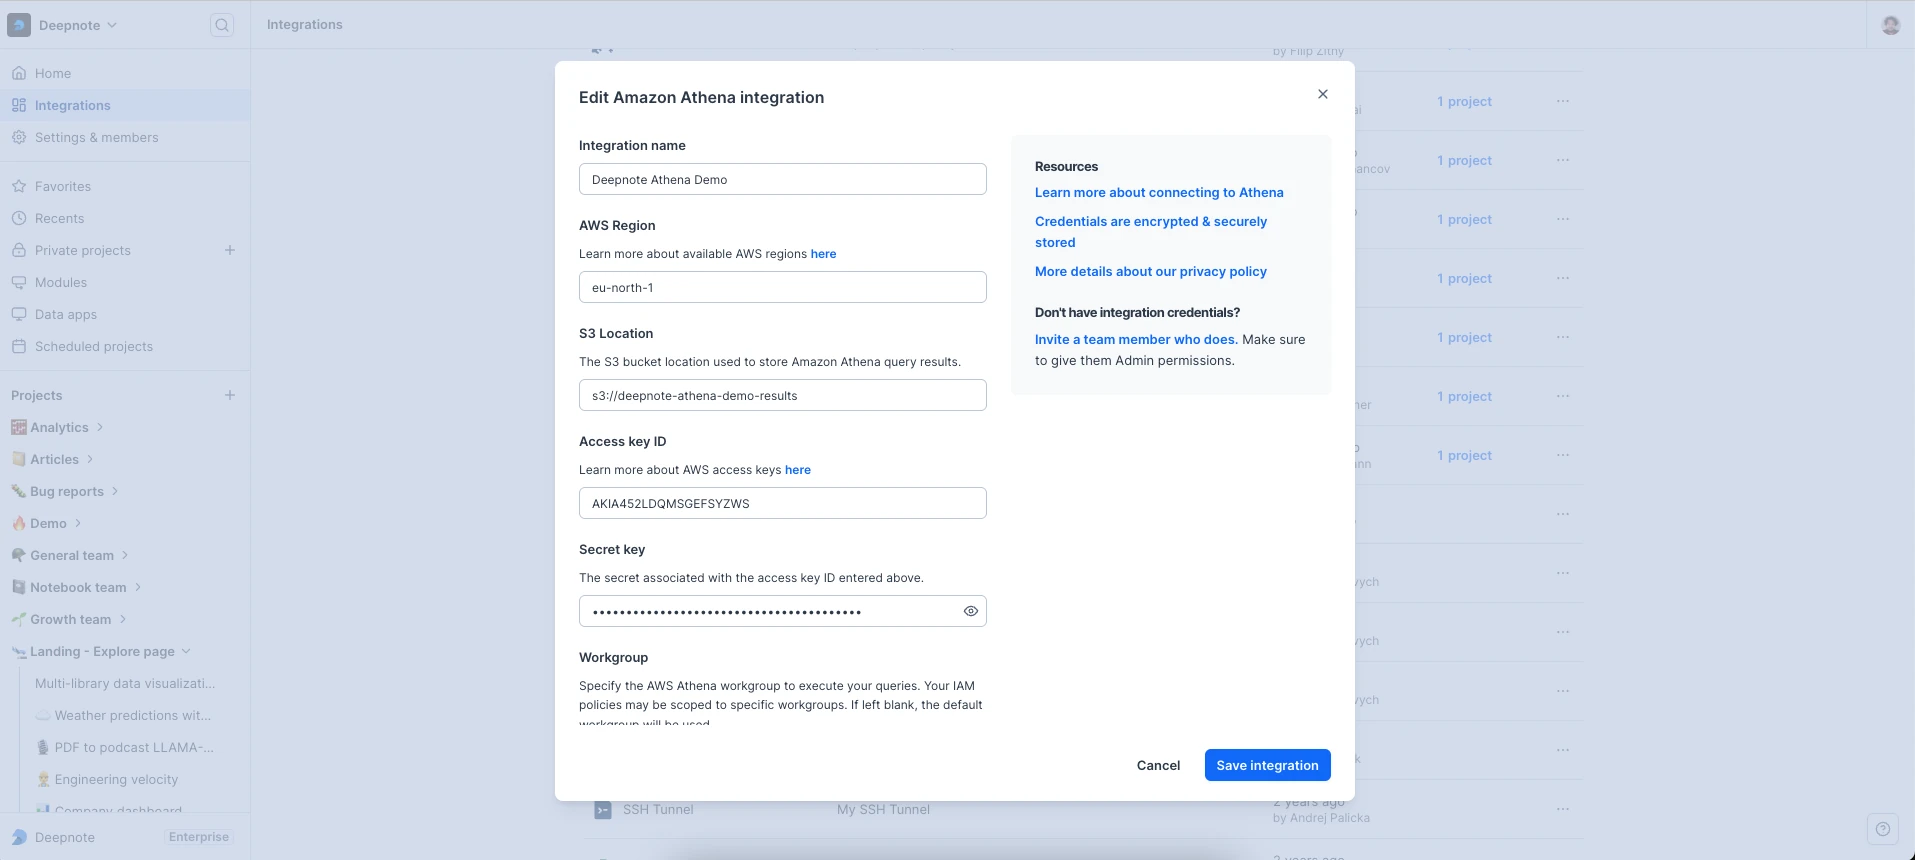
Step 6: Connect Deepnote to Athena
Now let's set up Deepnote to query Athena. You'll need administrator privileges in Deepnote to create this integration:
- Sign in to your Deepnote account
- Navigate to the Integrations page
- Click + Add integration
- Choose Amazon Athena from the options
- Enter the following connection details:
- Name: "Deepnote Athena Demo"
- Region: The AWS region where you created your resources
- Output bucket URL:
s3://athena-demo-results/ - Access Key ID: The IAM user access key you created earlier
- Secret Access Key: The IAM user secret key you saved earlier
- Click Create integration
After creating the integration, you need to connect it to your project:
- Navigate to a new or existing project
- Click on the "+" button to add a new block
- Select SQL cell
- From the dropdown menu, select your "Deepnote Athena Demo" integration
- Now you can write and run SQL queries against your Athena database
Step 7: Running Queries in Deepnote
Now you're ready to analyze the NYC Airbnb data:
- In your Deepnote project, add a new SQL block
- From the dropdown menu, select your "Deepnote Athena Demo" integration
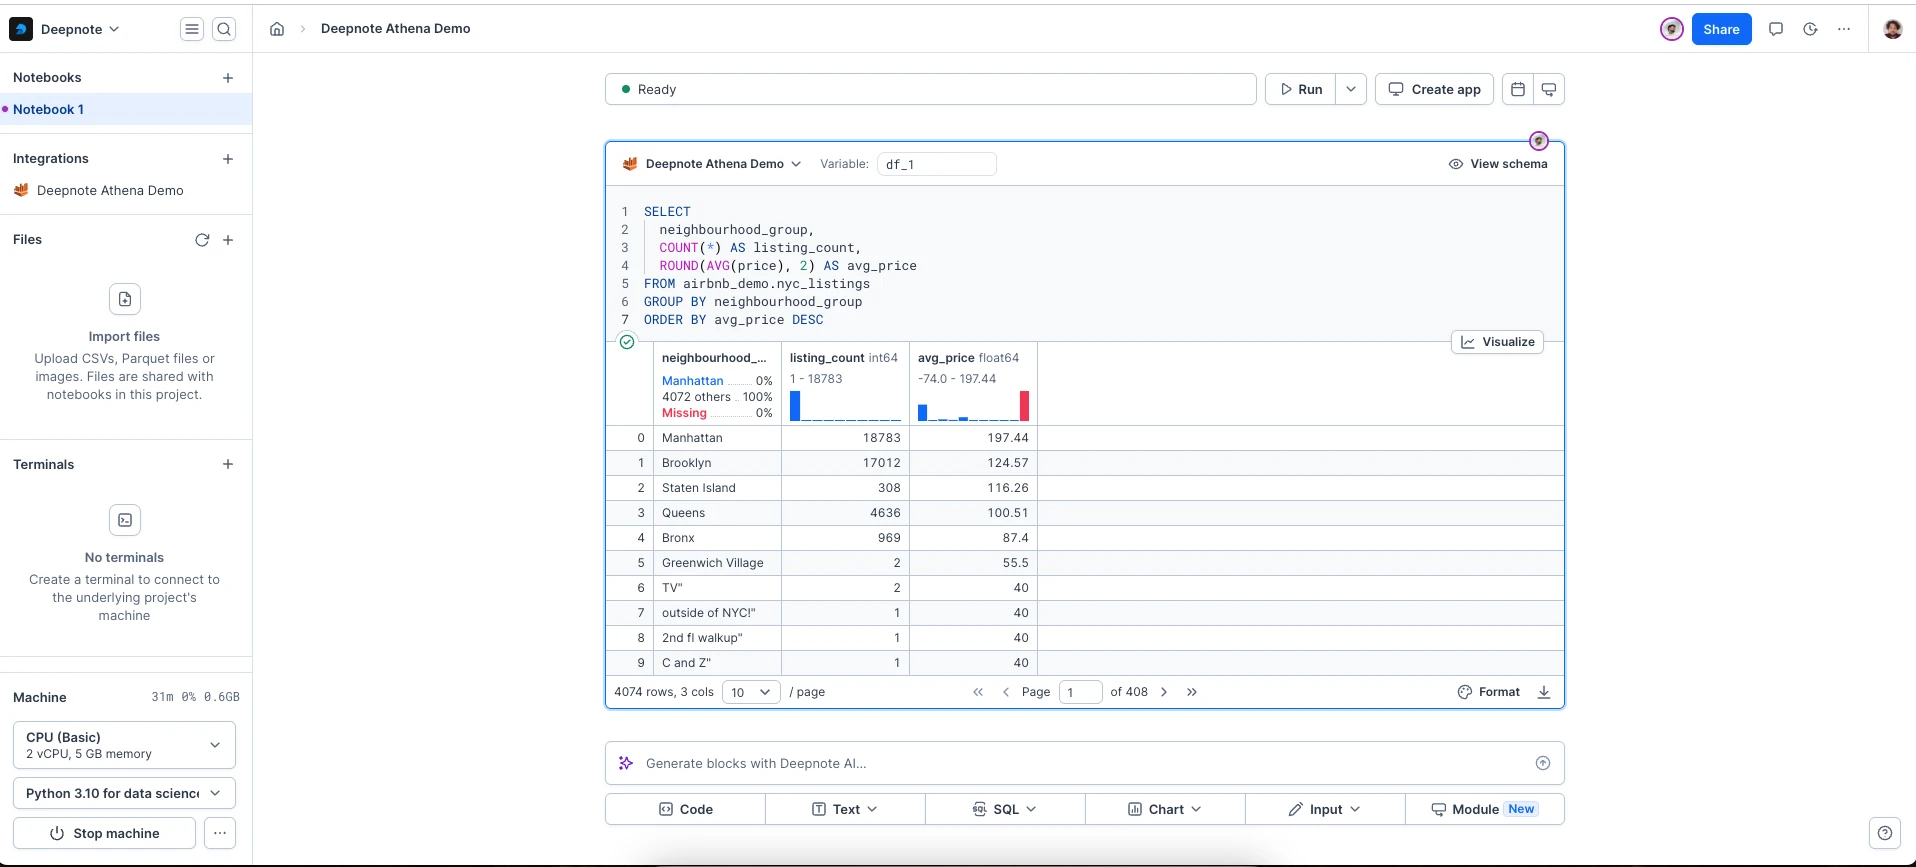
- Write a query in the SQL block, for example:
SELECT neighbourhood_group, COUNT(*) AS listing_count, ROUND(AVG(price), 2) AS avg_price FROM airbnb_demo.nyc_listings GROUP BY neighbourhood_group ORDER BY avg_price DESC; - Click the "Run" button or press Shift+Enter to execute the query
- Deepnote will display the results as a table below the SQL block
- You can now analyze the results or create visualizations directly in Deepnote
Sample Queries to Try
Here are a few interesting queries to explore the Airbnb dataset:
Price Distribution by Room Type
SELECT
  room_type,
  COUNT(*) AS listings,
  MIN(price) AS min_price,
  ROUND(AVG(price), 2) AS avg_price,
  MAX(price) AS max_price
FROM airbnb_demo.nyc_listings
GROUP BY room_type
ORDER BY avg_price DESC;
Top 10 Neighborhoods by Average Price
SELECT
  neighbourhood,
  neighbourhood_group,
  COUNT(*) AS listings,
  ROUND(AVG(price), 2) AS avg_price
FROM airbnb_demo.nyc_listings
GROUP BY neighbourhood, neighbourhood_group
HAVING COUNT(*) >= 5
ORDER BY avg_price DESC
LIMIT 10;
Distribution of Reviews
SELECT
  CASE
    WHEN number_of_reviews = 0 THEN 'No reviews'
    WHEN number_of_reviews BETWEEN 1 AND 10 THEN '1-10'
    WHEN number_of_reviews BETWEEN 11 AND 50 THEN '11-50'
    WHEN number_of_reviews BETWEEN 51 AND 100 THEN '51-100'
    ELSE '100+'
  END AS review_bucket,
  COUNT(*) AS listing_count,
  ROUND(AVG(price), 2) AS avg_price
FROM airbnb_demo.nyc_listings
GROUP BY 1
ORDER BY CASE
  WHEN review_bucket = 'No reviews' THEN 1
  WHEN review_bucket = '1-10' THEN 2
  WHEN review_bucket = '11-50' THEN 3
  WHEN review_bucket = '51-100' THEN 4
  ELSE 5
END;
Next Steps
- Try uploading your own datasets to S3
- Experiment with more complex SQL queries in Deepnote
- Create visualizations based on your query results
- Set up automated workflows combining Athena and Deepnote
Now you have a fully functional setup for analyzing large datasets with Amazon Athena and Deepnote. Happy querying!